Downward Facing Dog: How to Do It Right and What It Actually Does For Your Body
Downward Facing Dog is probably the most recognised yoga pose in existence. It's in every beginner class, every online tutorial, every yoga-adjacent workout video. And because it looks straightforward — hands down, hips up — most people assume they're doing it correctly.
Most people are not.
Downward Facing Dog pose, when done well, is one of the most effective full-body positions in yoga. It decompresses the spine, lengthens the hamstrings and calves, builds shoulder and wrist strength, and can genuinely shift your energy within a few breaths. Done poorly, it compresses the wrists, rounds the upper back, and feels uncomfortable enough that people quietly start dreading it in class.
This breakdown will show you what's actually happening in the pose, what to fix, and how to make it work for your body right now.
What Downward Dog Is Actually Doing
The name gives you the shape — an upside-down V. But what's happening inside that shape is more interesting than the picture.
Your spine is getting a chance to decompress. For most adults, gravity spends the majority of the day compressing the spine downward. In Downward Dog, gravity works the other way — the hips are elevated, the head drops below the heart, and the spine gets to lengthen. People who sit for long periods often notice an immediate sense of relief in their lower back in this pose once they've learned to do it properly.
Your hamstrings and calves are under a long, sustained stretch — the kind that desk work, driving, and limited daily movement leaves chronically shortened. Your shoulders are working to stabilise the upper body, which builds the kind of functional strength that carries over into posture off the mat. And the mild inversion — head below heart — promotes circulation and has a noticeably calming effect on the nervous system.
That's a lot of work from one shape. But only if the shape is right.
How to Do Downward Facing Dog: Step-by-Step
Start on all fours — hands under shoulders, knees under hips. Spread your fingers wide, press through the base of each finger and the heel of the hand. That grip through the whole palm is what protects your wrists.
Tuck your toes and lift your hips up and back. Think about pushing the floor away from you with your hands as your hips rise. The goal is a long, straight spine — not a perfectly straight set of legs.
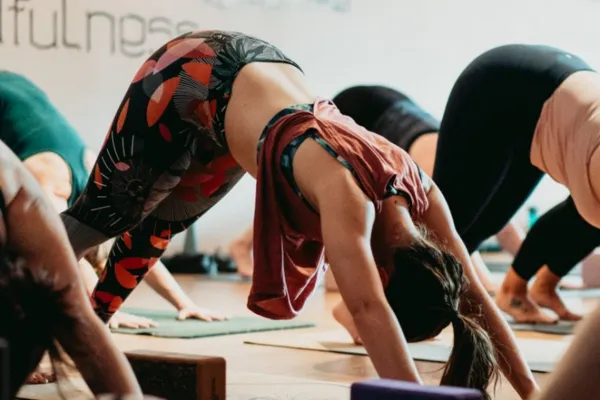
Press your chest toward your thighs. This is the cue most people miss. The tendency is to let the upper back round and the shoulders collapse inward. Instead, rotate your upper arms outward slightly and press the floor away — your shoulder blades should spread, not scrunch.
Let your heels work toward the floor. They may not reach it, especially early on, and that is completely fine. The heel position is a byproduct of hamstring length, not something to force. Bent knees in Downward Dog are not a failure — they're often the smarter option if your hamstrings are tight, because they allow the spine to lengthen properly without your lower back rounding to compensate.
Hold for five slow breaths. Breathe into the length of the pose — each exhale is a chance to let the spine decompress a little further.
Common Mistakes in Downward Dog
The most frequent problem is a rounded upper back. When the shoulders collapse inward and the chest sinks toward the floor, the pose loses most of its spinal benefit and puts strain on the wrists and neck. The fix is to push the floor away more aggressively and let the chest drive toward the thighs.
The second is locking the knees in an attempt to get the heels down. Forcing straight legs when the hamstrings aren't ready pulls the pelvis into a posterior tilt, rounds the lower back, and defeats the purpose of the pose. Slightly bend the knees, get the spine long first, and let the legs gradually straighten as your range of motion improves over weeks and months.
Third: weight dumped into the wrists. If your wrists ache in this pose, your weight is sitting too far forward. Shift your weight back toward the hips and actively press through the fingertips. The wrists should be working, but they shouldn't be absorbing everything.
Modifications and Progressions
If your wrists are sensitive: Try dolphin pose instead — forearms on the floor, hips high. Same spinal benefit, zero wrist load. Or use blocks under the hands to reduce the angle at the wrist.
If your hamstrings are very tight: Keep a generous bend in the knees throughout. Prioritise the spine over the legs every time.
If you want more challenge: Lift one leg behind you (Three-Legged Dog) and notice what happens to the stability demand on the standing side. Keep the hips level rather than rotating them open.
Who Should Be Cautious
If you have a current wrist injury or carpal tunnel, move to dolphin or skip this pose until you've spoken with a health professional. If you have a shoulder injury, the load through the rotator cuff in this position may be irritating — a teacher can offer modifications. Avoid or modify significantly if you have high blood pressure or are in late-stage pregnancy.
Where It Fits in a Practice
Downward Dog sits naturally in the middle of any sequence as a transitional reset — and that's exactly how it's used in most sun salutations. It's also a useful standalone rest position between more demanding poses. Many teachers cue it as a "home base" to return to when the body needs a moment between shapes.
It fits naturally before lunges (step one foot forward from Down Dog), before standing poses, and as a counterpose after backbends.
Downward Facing Dog is one of those poses that pays off the more honestly you practise it. Not forcing the heels, not collapsing the shoulders, not muscling through the wrists — just a long spine, active hands, and five real breaths.
Get that right, and you'll understand why it's in almost every class ever taught.
The fastest way to improve your alignment is to have someone watch you in real time. Check the OBH class timetable this week, or start your 30-Day Unlimited Trial and build the foundation properly.
